Lesruba Designs T-shirts and Gifts

Holiday T-shirts and Gifts, Home Decor, Special Occasion Invitations from Lesruba Designs

lesruba designs on facebook lesruba designs youtube lesruba designs on twitter lesruba designs on pinterest lesruba designs on instagram
  • Home
  • Holidays
    • Valentine’s Day
    • Earth Day
    • Easter
    • Mother’s Day
    • Father’s Day
    • July 4th
    • Halloween
    • Thanksgiving
    • Christmas
  • Occasions
    • Back-to-School
    • Birthday Gifts
    • Graduation
  • TV Shows
    • Big Bang Theory
    • Castle
    • Dancing with The Stars
    • The Bachelor
    • The Voice
  • Products
    • Books
    • Bath Mats
    • Desk Lamps
    • iPad Cases
    • iPhone Cases
    • Flip Flops
    • Scarves
    • Shower Curtains
    • Sneakers
  • Printables
  • Blog
    • Affiliate Marketing
    • Graphics + Fonts
    • Print On Demand
    • Social Media Marketing
    • WordPress
  • Resources
You are here: Home / blog / How to Point Namecheap Domain to Siteground Hosting in 3 Easy Steps

How to Point Namecheap Domain to Siteground Hosting in 3 Easy Steps

June 24, 2019 By: Lesruba Designscomment

how to point namecheap domain to siteground hosting 3 easy steps

*This post contains affiliate links, which means that by clicking on a link and purchasing a product, I’ll receive a small commission, at no additional cost to you. Please see my disclosure policy for details.

You registered your domain with Namecheap. And you signed up for hosting with Siteground. But how do you get them to communicate with each other. In order to point your domain which is registered with Namecheap to your web hosting on Siteground, follow this easy tutorial.

Step 1

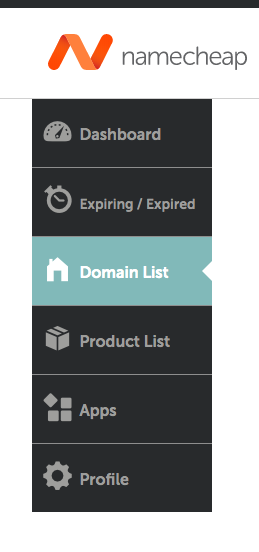
STEP 1: Login to your Namecheap account and in the left menu select “Domain List.“

Namecheap dashboard select Domain List

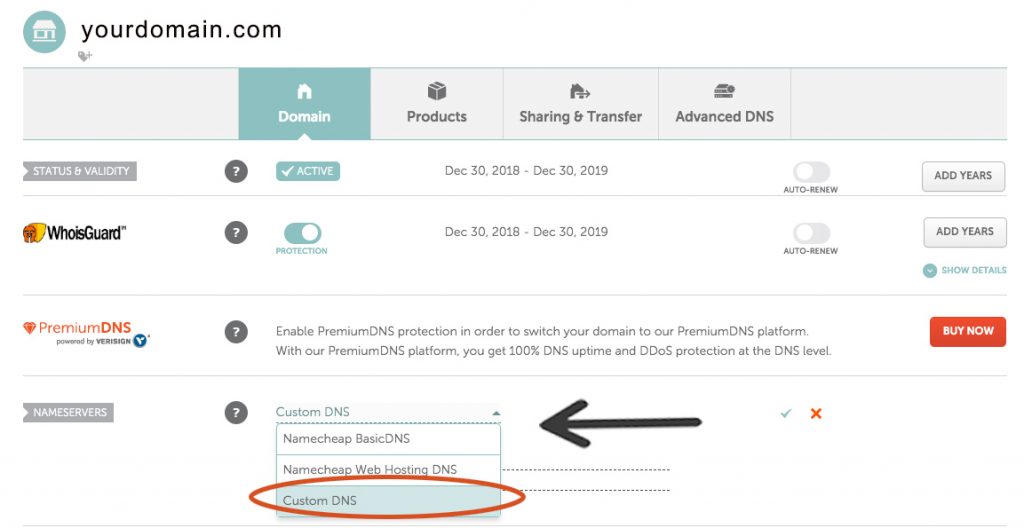
Find the domain you want to point to Siteground and click the “Manage” button on the right side.

manage domain in Namecheap

Go down to where it says “Nameservers” and select “Custom DNS” from the drop-down menu.

Namecheap custom DNS

Step 2

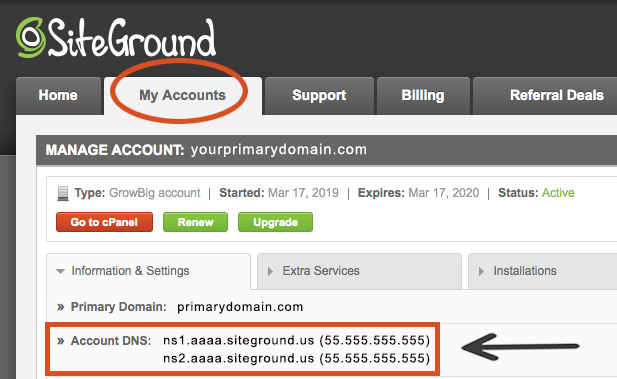
STEP 2: Next, go back into your Siteground account, under “My Accounts” and you’ll see the Account DNS nameservers listed. There are two: ns1 and ns2. For this example, you would use: ns1.aaaa.siteground.us and ns2.aaa.siteground.us. Copy from Siteground.

where to find Siteground account DNS

Step 3

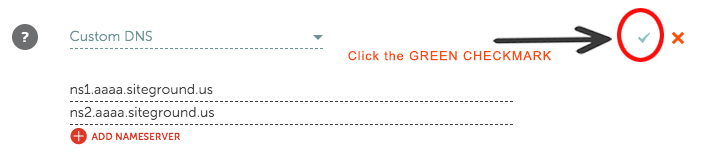
STEP 3: Paste them into the “Custom DNS” fields back in Namecheap like this:

add nameservers Namecheap

Now click on the green checkmark on the right to set the nameservers.

You’re done! That’s how easy it is to point your Namecheap domain to your Siteground hosting.

Share this:

  • Click to share on Facebook (Opens in new window)
  • Click to share on Twitter (Opens in new window)
  • Click to share on Tumblr (Opens in new window)
  • Click to share on Pinterest (Opens in new window)

Related


Leave a Reply

Your email address will not be published. Required fields are marked *

four × five =

Little Boo Second Birthday Invitation Suite

Halloween 2nd birthday party invitation and supplies cute ghost

Little Boo Second Birthday Collection

Little Boo is Due Boy Baby Shower Suite

Gender Neutral Balloon Baby Shower

Recent Posts

  • Little Boo Is Due Halloween Baby Shower
  • Orange Little Cutie Baby Shower Invitations
  • Kids Birthday Pool Party Invitations
  • Gold Glitter Quinceanera Invitations
  • Halloween Patterns and Backgrounds

50 feminine girly wordpress themes

Up Up & Away Hot Air Balloon Baby Shower

Lesruba Designs is a participant in the Amazon Services LLC Associates Program, an affiliate advertising program designed to provide a means for sites to earn advertising fees by advertising and linking to Amazon.com.

Blog | Privacy Policy | Disclosure | About Us

Copyright © 2025 Lesruba Designs. All rights reserved. ·
Powered by Modern Blogger Pro Theme From Pretty Darn Cute Design on the Genesis Framework.